Creating your VPN
(This is a set up guide for your own personal PC. For this to work the setting already need to be made on your Server that give your user logon the permissions to use a VPN. If this is not set up then contact the Andisa Supportdesk on 01423 290029 so that we can arrange for this work to be carried out. Thanks!)
Click on start button in the bottom right hand corner of the screen.
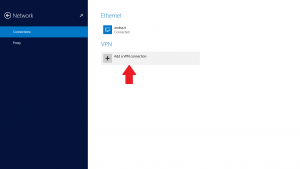
Go to Settings > Network Settings

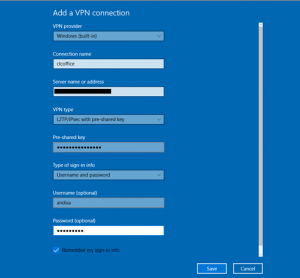
Select ‘Add a VPN connection’ and fill in the information:

- Select the VPN provider as Windows Built-in / Microsoft.
- Give the VPN a suitable name – e.g. ‘Office VPN’.
- Input the name of your Server (Contact Andisa Support Desk if you require this information)
- Select L2TP/IPsec with pre-shared key.
- Enter the Pre-shared Key (Contact Andisa Support Desk if you require this information)
- Select ‘Username and password’ for the type of sign in info.
- Enter your normal username and password that you use to sign in.
- Tick remember my sign-in info.
- Click Save.
Test the Connection by selecting the newly created VPN and clicking connect. You may have to enter your username and password. If you do remember to tick the box that says ‘remember my credentials’
To create a VPN shortcut
Once the VPN has been created and tested, you can create a shortcut for it on the desktop. Follow the steps below:
- Right click in a blank space on the desktop, select New, select Shortcut
- It will ask you to ‘type in the location of the item’ – type ‘rasphone “name of VPN”’ (if your VPN is called Office VPN you would type in: rasphone “Office VPN” )
- It will then ask you to give it a name – select an appropriate name. Then click finish.
- Right click on the shortcut and select properties
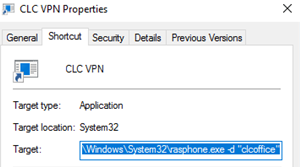
- In the target add ‘-d’ after the ‘.exe’ but before the “VPN name” as in the picture below.
- Click ‘Change Icon’ and change the icon to something suitable.

Whenever you need to connect to the VPN – now you can simply double click on this desktop shortcut and you will connect.
